Excelsior! – Ions and Fires and Scares! Oh My!
Right, time to start my new blog post. How should I write my introduction?
Shows like The Office used cold opens; that could be new and interesting?
What, like a ‘bit’?
Sure?
How would that work in written form though?
Google, define ‘cold open’.
That’s interesting. The earliest cold opens were in the 1960’s.
Google, did blogging exist in the 1960’s?
They didn’t; that was a silly question.
Google, what didn’t exist in the 1960’s?
*5 minutes later*
Google, what is the national minimum wage in Norway?
Wasn’t I doing something? Do I have ADHD?
Google, do I have ADHD?
“Do you struggle to stay focused at home, work or in social situations?”
…
…
Google, define ‘focus’.
Hey! The new Ford Focus looks pretty cool…
Wasn’t I supposed to be doing something?
Shit! My blog! Right, stay focused.
*5 minutes later*
Google, did Saddam Hussain have a Stargate?
Yes, the above did happen and no I didn’t find out whether Saddam Hussain had a Stargate.

What’s kickin’, little chicken? How are you? You look lovely! Did you do something new with your hair? Whatever it is, it’s working for you.
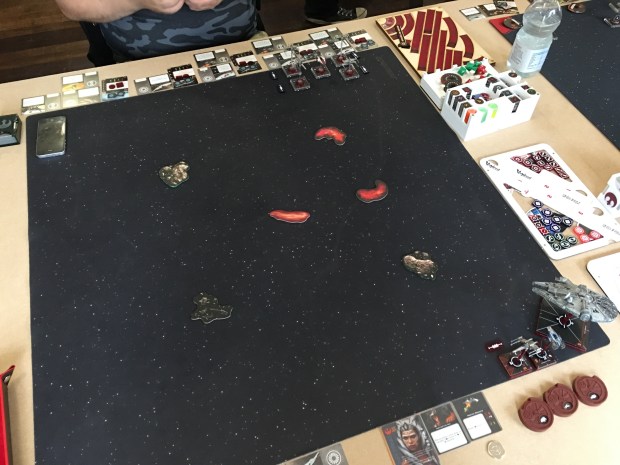
Finally, almost four months into the year I’m bringing you an event write up following my visit to Excelsior! Bristol which was not only my first event of the year, but my first official event of 2.5. How was it, I hear you ask. They’ve ruined the game haven’t they? How did it feel? Do you miss the old rules? How do you hang toilet paper: over or under? Woah, calm down there old sport. It was fun! No, nothing is ruined! It felt natural? I don’t miss the old rules. Over; I’m not a maniac.
We played four breezy rounds of swiss over the course of the day but before we jump into the main action, I just want to take a moment to ask you something. Ahem. You don’t want to miss out on future posts do you? Of course you don’t, you’re not crazy. Unless you hang toilet paper under, in which case what’s up with that bro? If you enjoy my blog did you know you can subscribe? Subscribing is completely free and WordPress notifies you when I publish new articles so you won’t miss out on my exuberant content. To subscribe, head on over to my main page here, scroll down to the bottom, enter your e-mail and click the subscribe button. It’s as easy as that.

Right, I feel like I’ve been talking bollocks for too long. Let’s talk about X-Wing, shall we?
Preparation
Thankfully, preparation for this event wasn’t difficult and that familiar crippling feeling of list-doubt never came. Unlike a drunk spouse sneaking into the bedroom at an unsociable hour, it didn’t enter my mind on the drive to Bristol either.Since AMG dropped the new points and scenarios on us, I’ve had plenty of time to sit and play with my squad builders. As some of you may know, my favourite faction is the Republic. I took a brief break from the faction last year (to practise with a Rebel hyperspace list) but I’m eager to make a return. We’re treading fresh ground in a new era of X-Wing so it only seems fitting I usher in this period with some of my favourite chassis’ and pilots in the game.
When the Republic first hit shop floors in the first quarter of 2019, Anakin piloting the 7B configuration Aethersprite with R2 Astromech alongside a Jedi compadre and two V-19 Torrents was all the rage. What a time to be alive. Sadly, as with all good things, this came to an end following an FFG points update and some other list took it’s place. Seeing as it’s been three years since I’ve put Delta-7B Anakin on the board, let’s start with him!

Three shields, three hull, three attack, two agility and a kickass dial to boot. As good a place as any to start. Naturally, Anakin will be my power piece. I want this guy in the fight as much as possible kicking out as much damage as he possibly can. I have fifteen upgrade points available so I’m spoilt for choice when it comes to my toys. Let’s start with the obvious; R2-D2. Happy beeps. I’ve yet to use Artoo in my practise games (as they’re usually over before I need to use the shield regeneration aspect) but he’s my safety blanket and I’m praying for the day I can remove an enemy device before it blows up. That leaves me seven points to play with. My instincts naturally gravitate towards Shield Upgrade but having not needed it in five out of five practise games*, I felt the points were better spent on upgrades that gave Anakin more potential time on target. I’ve never used Extreme Maneuvers but it fit the bill and I fancied a change so I #YOLO’d it, as the kids would say. Word to your mother. This left two points which felt wasteful spent on Ion Missles and due to a lack of useful Modifications, it made sense to spend the remaining points on another Force Upgrade – because Anakin has two now! Patience and Brilliant Evasion are probably the best for what I can afford, and seeing how I don’t really want to stack up additional deplete tokens, I went for the latter. My goal when outfitting Anakin’s Delta-7B was to make him the portion of my list that kicks the shit out of my opponents ships. I’ll try and identify what enemy ship grants me the best victory point margin and flank it while other portions of my list fill out a mixture of attack and objective capture.
*It’s this kind of thinking that leads you to situations later on where one extra shield would have saved you…

Anakin doesn’t come with plot armour so he’s going to need a friend to make sure enemy casualties are high. What’s that noise? Listen carefully! Can you hear that? That’s the sound of Barriss Offee and her massive balls making her way down the corridor. Barriss now checks every box for the cheap, effective Republic filler ship. Back when I was playing Rebel’s I had a soft spot for Ahsoka Tano in the A-Wing with Concussion Missiles because it enabled me to double modify a strong three dice shot with ease. Alongside the re-rolls from a Laat, I love Barriss Offee with Concussion Missiles and Instinctive Aim for the same reason. Barriss can essentially double modify a three dice attack from range one, two and three. Not to mention this essentially becomes a four dice attack in range one when you add the CLT bullseye bonus focus result. This is crazy good value for three points and she’s a perfect wing mate for Anakin.

Seeing as I’ve just mentioned the Laat, let’s find a main support ship for this list. I’ve held off buying the Laat since they released because under previous points they were very lacklustre. I could never seem to strike a decent balance between practical usage and points cost. However, that’s all changed and this ship is a beast under the new points system. “Hawk” costs five points and has an upgrade allowance of twenty-fucking-three. This thing drifts across the board less like a little boat and more like a bowling ball. My initial thought was to ignore it’s poor damage output and to focus on full support by utilizing Seventh Fleet Gunner. An extra damage die on one of my other ships every turn seems great, right? Wrong. Kind of. I put it on the board and being disarmed unable to shoot at things felt wrong. Robbing myself of range one shots felt even worse. This thing needs to be shooting. The best upgrades for this ship, in my opinion, is Ghost Company and Clone Commander Cody. The combination of shooting twice (if I’m focussed) and pumping out strain tokens if I miss is a beautiful thing. This turns the dismal two die primary turret into a more unforgiving cattle prod I can’t help but get giddy about every time I use it.

So I need to be focused if I’m going to make the most out of my double tapping Laat and I have fourteen points left for a support crew. Enter, Aayla Secura. For fourteen points I can focus and then link this action into a purple coordinate. This means my fully beefed out “Hawk” can focus, coordinate and shoot twice at two different targets with the possibility of straining them. This thing has the heart of an ox and I’m very happy with its capability to perform the support role. Additionally, under the new scenario rules medium and large base ships count as two ships when contesting objectives which could be just what I need to tip the scales in a pinch.

Last but certainly not least I feel like I want a ship that can support and deal damage. Because, ya’know, I’m greedy and a sucker for versatility. I’ve got four squad points remaining and I’m almost certain I want to fill that spot with another Delta-7 Jedi. I was just talking about how much I liked Ahsoka Tano for Rebels, but is she viable for Republic? Spoiler alert: yes she is. Ahsoka’s ability lends itself perfectly to scenario and objective play because I can use it to take an action which frees up her standard action to grab objectives. Additionally, this means another personal favourite droid of mine can make a return appearance and that makes me very happy. As if you hadn’t guessed yet, it’s C1-10P. Ahsoka is PS3 which means she’s likely to move before most things and that means Chopper has the creative space to be generous with his jam tokens in his erratic state. He has a heart of gold, doesn’t he? No, literally, his heart is made of gold because it’s a great conductor of electricity and heat. Stay in school kids. I’ve got a singular point left over and after getting some clutch usage from Compassion from my days with Rebel Leia, I opt to go with this as it’s a trigger I’m familiar with. Anyhow, I can’t see it coming up too often.

That gives is a final list of:
(8) Anakin Skywalker (Delta-7B)
R2-D2, Extreme Maneuvers, Brilliant Evasion.
(5) “Hawk” (Laat/i Gunship)
Aayla Secura, Ghost Company, Clone Commander Cody.
(3) Barriss Offee (Delta-7)
Instinctive Aim, Concussion Missiles, Calibrated Laser Targeting.
(4) Ahsoka Tano (Delta-7)
C1-10P, Compassion, Calibrated Laser Targeting.
Damn, that looks good doesn’t it? Santa has come early and he’s emptied his sack all over me. Oh, you are immature. Grow up. It really does seem like I’ve got everything I want from a Republic list all wrapped up in a neat little package. I’ve got equal parts support and firepower which means I should be able to hold my own on the tabletop. As an added bonus, this list doesn’t fall victim to the card bloat problem we’re seeing people complain about recently. I think this could really work!
So let’s sum up what we’ve got:
- Anakin is pilot skill six, hits hard, moves fast and has shield regeneration capability.
- Barriss hits hard and moves fast.
- Ahsoka provides jam support, action economy and reasonable firepower.
- “Hawk”provides action economy, re-rolls on friendly attacks and de-buffs enemy ships.
How’s that for a slice of fried gold? Yeah, boy-eee!

While I do really like this list, I’m unsure of how the meta will take shape which means it could be that four ships just isn’t enough to cut the mustard. However, I’m one step ahead of you like a carpenter making stairs. If it unfolds that I do need an extra ship on the table, Anakin is prime real estate at a hefty eight points of my list which could easily be downgraded to a different Delta-7 Jedi, like Mace Windu. This fundamentally splits Anakin into two different ships and enables me to take fourth Delta-7 Jedi, like Luminara Unduli.
That would look something like this:
(5) “Hawk” (Laat/i Gunship)
Aayla Secura, Ghost Company, Clone Commander Cody.
(3) Barriss Offee (Delta-7)
Instinctive Aim, Concussion Missiles, Calibrated Laser Targeting.
(4) Mace Windu (Delta-7)
R4-P17, Brilliant Evasion, Calibrated Laser Targeting.
(4) Luminara Unduli (Delta-7)
R4-P, Patience, Calibrated Laser Targeting.
(4) Ahsoka Tano (Delta-7)
C1-10P, Compassion, Calibrated Laser Targeting.
In old money, (not that that’s at all relevant any more) this is 281 points of Republic ridiculousness. I’m always wary of low health, high agility ships because they have a tendency of dying in one shot when I put them on the table. However, that’s probably user error despite my unwillingness to admit it on occasion.
My bag is packed with both lists (in addition to a scum list I’ve flown once and made adjustments to) but for this event I’ll be flying the one with Anakin.
Tournament Day
I woke up. I drove. I arrived. It was nice to finally complete a journey without having car warning lights shining up my dashboard like Blackpool illuminations.
So as I mentioned at the start, the day was set up for four rounds. We played each of the four new scenarios once. We had a short, concise explanation of the round we were playing by Dad- Err. I mean, Richard Greenaway and Steve Boulton before moving away to our tables to set-up and play for ourselves.
I’m going to do this a little differently today. I’m still going to try and paint a picture of my games in my usual style but I feel like I want to talk more analytically about the scenarios and the lessons I’ve learned overall which should be helpful for me and you. I’ll do this after each round and hopefully it’s mildly insightful so strap in because I’m totally gonna blow your mind with like, knowledge… n’ stuff.

FYI: This event was a casual, fun day among friends that served the sole purpose of us having fun, testing new squad building and just generally wrapping our heads around the new scenarios. Fun was had by all and everybody left in high spirits for the future of the game. I still feel like the scenarios could be themed better but overall each has it’s own unique feel and I wholeheartedly believe you have to approach each one with a different thought process.
Round One – Simon Greenaway
Scenario – Assault on the Satellite Array
Summary – Have more ships at Range 0-1 of objectives than your opponent to score 1 point in the end phase. Half points disabled. Full points scored for ships destroyed.
Always a fun game to be had when Simon is your opponent. Simon was flying the mighty Resistance and had Poe Dameron, Rey and Nimi Chireen. We had an initiative crossover at six – Poe and Anakin.
I’m just going to say it; objective placement confuses me and I don’t have many (if any) thoughts on where to place them. This is a theme that carried over into every game… I ‘won’ the ROAD roll which meant I couldn’t follow Simon’s lead and had to be a big boy and go first. I felt having an objective closer to the middle was best so it was easier to be at range one with the Laat, which in theory means I wouldn’t have to commit to large leaping movements in order to continue scoring and stay in the fight. Additionally, my Aethersprites can leap from one to another with ease if needed. Not seeing any downside to my reasoning I used this rationality with the second objective I placed too creating a nice triangle of objectives that were easily reachable. Next was obstacles which I tried to place in a way that kept the three objectives I want to focus on freed up and easy to manoeuvre between. Unfortunately, this placement meant Rey on her large base would be very happy… I spread my ships across the bottom of my board edge with two goals in mind:
- Score points for the objectives on my side of the table for the first two rounds, then branch out.
- Use Anakin to go fast and deny Poe Dameron the objective he closest to.

I’m just a simple man, trying to make my way in the universe. This is pretty much how it went. Turn one shots were exchanged and I stripped two shields from Poe and only lost a single shield on Anakin. I scored two objective points and Simon scored one objective point as Anakin successfully denied Poe.

I’d positioned myself too far forward with “Hawk” during deployment and instead of banking and risking clipping the debris I opted for the safe two turn which kept me in range of the objective. Woefully, this meant an aggressive Rey would be taking a range one shot into him later in the turn. I had the initiative which meant Anakin 5K-turned over Poe, removed the stress with his pilot ability and took a target lock on the Trigger Happy Fly-Boy. Poe took three damage, stripping his remaining shield and leaving him on two hull. All objectives were contested bare one, which I scored a singular point for.

Over the next few turns, I focussed on objective points and started to creep towards victory with 3/2 points consecutively while Simon scored 1/2. I broke Anakin off from Poe and turned my attention to Rey while Barriss chased the limping Poe for six turns trying to finish off his remaining two health. She was unsuccessful. Sixteen dice were thrown at him over this period and every single one either missed or was evaded… Poe not dying meant the game went on way longer than it needed to. (Especially as the timer was forgotten for round one.)

The victory condition was met by me when I gave up on killing Poe and decided to finish Rey instead. With the two points I scored that round for objectives and the full eight for Rey, I went from seventeen points to twenty-seven…
Result: Win, 27-14.
Republic MVP: Anakin – Consistent damage output, nimble and good time on target.
Resistance MVP: Rey – Consistent damage output with a tanky nature lending well to objective capturing and contesting.
I enjoyed this scenario despite Poe’s unwillingness to die and the lack of scoring outside the objectives . It felt decently paced and the objectives posed a welcome layer of tactical thinking that cannot be ignored when considering your movement options and ever changing win condition. I’m not sure how I’d play this differently in the future and out of the four scenarios over the course of the day this is the one that stumped me the most. I liked the aggressive approach with Anakin on turn one and think objective denial is equally as strong as objective capture. I think four ships is perfectly acceptable for this scenario, but you’ll probably have an easier time with five or more ships, especially if that includes one solid large base ship. Three ship lists understandably struggle to maintain momentum on objectives and will have to do some heavy lifting in the damage department to keep up.
There’s one thing from our game that stood out like a sore thumb. It’s glaringly obvious how the removal of half points thresholds specifically benefits large ships. Large ships are usually costed highly to offset their big health pool, strong weapons and upgrade accessibility. With games typically lasting between five to seven rounds it can be tricky to put enough damage through on one to see a points return and not seeing a return for your effort is simply frustrating.
Round Two – Tim Greenaway
Scenario – Chance Encounter
Summary – Have ships at Range 0-2 of objective in the middle while your opponent has none to score 1 point in the end phase. Half points (rounded down) on ships is enabled in addition to full points (rounded up) for ships destroyed.
Tim. Timbo. Timber. Tim Canterbury. Archbishop of Canterbury. Bishop Muzorewa. (One of my more obscure references). Tim had brought Imperial pilots Colonel Vessery, Maarek Stele, Major Vermeil and “Night Beast”. We had an initiative crossover at four – “Hawk” & Barriss and Major Vermeil & Colonel Vessery.
We don’t get to choose where the objective goes in this scenario so we placed it in the centre and start placing obstacles. I placed my obstacles around the middle and tried to make it generally quite cluttered, which I prefer, but left enough space for “Hawk” to circle around if needed and deliver his double-tap goodness.

Right, so the old fashioned dogfight but with a slight twist; there’s an objective in the middle. Did I care about the objective though? Yes. Got you there, didn’t I? You thought I was going to say no. I cared about it briefly anyway in the sense that I didn’t want to give Tim an easy point by not contesting it in turn one. I launched Anakin forward full throttle with a 5-forward, contested the point and we moved into turn two.
Anakin flanked and shot “Night Beast” who received one damage despite having a focus and evade token.Then it got very dramatic when Colonel Vessery stripped a shield from Barriss Offee and Maarek Steele followed it up with a crit, crit, hit. This destroyed the Padawan with an all too familiar triple blank green dice roll.
Anakin and Ahsoka took this personally and sought vengeance stripping all of Mareek’s shields. The following turn they both 5K-turned and claimed his remaining hull. Meanwhile, “Hawk” was putting in the work tapping away at the other targets.

Unfortunately our game was cut short with a concession from Tim who wasn’t enjoying the match and preferred to call it early.
Result: Win, 20-3
Republic MVP: Anakin – Consistent damage output, nimble and good time on target.
Imperial MVP: Maarek Steele – Reliable damage output with devastating critical hit capability.
I really don’t have much to offer you regarding this scenario. It’s just the dogfighting we’ve grown to love. That said, does the central objective in this scenario have relevance? Does it need to be there? You could say it draws the action to the centre of the board but dogfighting doesn’t need that carrot on a stick because the very nature of dogfighting is you go where the enemy is. It automatically draws you to each other with the simple goal of eliminating opposing ships. The central objective serves no real purpose and only clutters the rules. If you do somehow manage to score points from the central objective, would it change the overall outcome of the game? Probably not. All the same, dogfighting is fun and I appreciate the simplicity of this scenario.
Round Three – Richard Greenaway
Scenario – Salvage Mission
Summary – Collect objectives with a scenario ‘grab’ action. Score 1 point in the end phase for each objective you hold. You drop the objectives if you suffer a critical damage from any source. Half points disabled. Full points scored for ships destroyed.
The Greenaways come in threes unlike their Sith counterpart who, as we all know, come in pairs. Thankfully, playing them is always a pleasure and never a chore. Big Daddy Greenaway heard about the defeat of his young apprentices and was here to right that wrong with his Rebel pilots Kanan Jarrus, “Dutch” Vander, Ezra Bridger and Thane Kyrell. We had an initiative crossover at three and four.
I approached objective placement slightly differently here and wagered it would be best to set the objective further away from the middle. I predicted this would give me breathing room before I assaulted the central objective. Richard must have had similar gut feelings because he also placed his close to his own board edge. The other I placed at range four of Richard’s board edge.

On turn one Barriss Offee, “Hawk”, “Dutch” Vander and Kanan Jarrus all grabbed salvage crates. No shots were exchanged and we moved into round two.
I made a bad call here… I thought Ezra was going to take the central salvage crate while Thane came around for a flank. This didn’t happen and instead Ezra stormed 5-forward right into my back line while Thane came up the rear and took the central salvage crate. This meant Barriss Offee bumped into Ezra, but I wasn’t concerned and took the chance to try out the new rules and performed a stressful focus action. Anakin, “Hawk”, Barriss and Ahsoka then all shot at a tokenless Thane Kyrell who lost his three shields (he had a shield upgrade). Then it was Kanan’s turn to shoot. Oh boy… Kanan fired a warning shot across Barriss’ nose at Range 2: hit, hit, hit, crit. Careful, you idiot. I said across her nose, not up it! Barriss evaded nothing with another fistful of blanks. Tim did this exact thing to me not sixty minutes ago… Like father, like son. Overall, this turn set me back heavily as I lost a ship and two salvage crate scoring opportunities. Richard scored a whopping six points to my measly one.
Ongoing Score Counter: Losing, 8-3.
It can’t get worse, right? Right!? Turn three saw Anakin lose three shields, a hull and gain an ion token courtesy of Kanan in the Ghost. There was a brief reprisal when Anakin and “Hawk” finished off Thane while Ahsoka put minor damage into Kanan. (Importantly, the damage she inflicted included a critical hit which meant Kanan dropped his salvage crate enabling what happened next). The Ghost 4K-turned and prepared another attack on Anakin… Thankfully, Anakin made it through with shield regeneration aide from R2-D2. Thanks little buddy! Meanwhile, in the background of this destruction Ezra collected Barriss’ salvage crate giving Richard a 3-1 objective lead.

Ongoing Score Counter: Losing, 13-10.
I needed to make some points back and quickly because Richard was getting uncomfortably close to the victory condition. Ahsoka grabbed Kanan’s recently dropped salvage crate and came around for some shots on Ezra which was fruitless. Anakin escaped the clutches of Kanan making use of a 2-bank and 1-hard boost in an effort to get behind him. In a weird turn of events, Anakin then caught Ezra with his pants down and blew him away in a combined effort with “Hawk”. However, with every positive comes a negative. Kanan wanted blood and destroyed Ahsoka evening up the score again…
Ongoing Score Counter: Losing, 18-16.
There’s five minutes left on this round and I’ve got a win condition. There’s still hope. “Dutch” Vander has a single remaining hull and Anakin is in a prime location to capitalise on it. “Hawk” 2-turns but is unable to get shots unless I rotate the turret. If I do, I’ll get a two dice range three shot at Kanan… Pointless. Instead I opt to focus into a linked purple co-ordinate courtesy of Aayla Secura crew: I give Anakin a target lock on “Dutch” hoping to secure my victory before revealing Anakin’s 2-sloop.

I’ve got two force, a target lock and “Dutch” is at range 3 without a token as he’s double stressed from a panicked pilot. I roll my dice. Hit, blank, blank. Okay, shit… But I’ve got a target lock! This can still happen! I only need one damage to win… I re-roll my two blanks and I’m punished for having hope. Two more blanks. This wasn’t looking good but if Richard doesn’t roll any– Ah, two evade results. Nevermind.
Result: Loss, 18-16.
Republic MVP: Anakin – Consistent damage output, nimble and good time on target.
Rebel MVP: Kanan Jarrus – Very high health pool and damage output with additional board control with Primary Weapon, Ion Cannon and Veteran Turret Gunner.
This was a really fun scenario and we were graced with plenty of natural critical hits when shooting which enabled the scenario to really show off how the salvage crates can sway the score.
My overall tips for this scenario would be to grab the salvage crates with your ships that don’t rely on advanced manoeuvres to do their job (in this scenario you perform a 2-forward stress manoeuvre if you attempt an advanced manoeuvre while holding a salvage crate). As with ‘Assault on the Satellite Array’ I’d say be patient. Grab the salvage crates that are comfortably within reach and then start laying the groundwork for your win condition, whether that be more objectives or killing a big target/multiple smaller targets. Objective points are harder to deny in this game mode as you are reliant on critical hits to prevent your opponent scoring, unlike ‘Assault on the Satellite Array’ where your presence alone is all it takes to deny objectives. Unless you have reliable ways of performing critical hits, I’d recommenced finding more reliable way of scoring. Be calculated in your approach and respect the knowledge that the game can snowball rather quickly if you fall behind.
There it was again though, much like in the Assault on the Satellite Array scenario. Not scoring half points on a large ship is devastating. They’re incredibly difficult to burn down in the time available because they are by nature hard to kill and kick like a mule. If you’re list building for a tournament don’t overlook large ships. I really think they’re solid choices for all four scenarios.
Round Four – Toby Harris
Scenario – Scramble the Transmission
Summary – Claim control of objectives with a scenario ‘claim’ action. Score 1 point in the end phase for each objective you hold. Random chance to not claim an objective if your opponent controls it when you ‘claim it’. Half points disabled. Full points scored for ships destroyed.
The final game of the day and it’s against list building extraordinaire, Toby Harris. At this point Toby was on a 3-0 win record, as were two other people in the room. However, none of those people were playing each other. Yeah, weird right? TTO seemed to have soiled itself and was just randomly pairing people despite the days match-up history. (Disclaimer: I know next to nothing about the inner workings of TTO but I’m well aware a great deal of work is needed to ensure a system like this functions like a well oiled machine. The points changes can’t have been easy on the developer(s) and I’m not throwing any shade at them. Put down your pitchforks and take a breath. Thank you TTO for offering a great website used and loved by many). Either way, it’s a friendly casual event and nobody is really all that fussed so lets just crack on with it.
Toby was sporting Scum pilots Maul, Ndru Suhlak and two Mandalorian Royal Guard Fang Fighters. We both chose to put an objective in one of our corners and the other as far forward as possible. I figured more distance between objectives would give me some breathing room against the Fangs who like to be up close and personal. I tried to create some clutter with the obstacle placement but left a large open channel Toby would then use to his advantage.

Turn one we both moved forward and scrambled the two objectives on our respective sides.
Ongoing Score Counter: Draw, 2-2.
Barriss hung back (scared of being shot off the board in one shot again) hoping to find a safe future opportunity while Ahsoka did the opposite and found herself taking shots from Maul and both Fangs. Toby’s dice were dog egg and Ahsoka only took a shield in damage. Phew, that was close. However, the central objectives was scambled by one of Toby’s Fangs. Anakin was in a fight of his own on the board edge and had 3-banked left and 1-hard boosted right dodging the firing arc of Ndru while shooting into his side claiming both shields. So far, so good?

Ongoing Score Counter: Losing, 5-4.
Ahsoka shot forward a little too optimistically and opted to take a focus token instead of scrambling the objective under her because it seemed like safer option if Maul full-stopped. He did full-stop and rotated towards Ahsoka shooting her at range one which left her on two hull. I wish I’d considered that when setting my dial. “Hawk” 1-banked to glory, taking a focus action ready to double-tap some Mando Royal Guards. At the least here I was expecting to throw a couple of strain tokens their way but instead “Hawk” went full-psycho and pinged two damage from both Fangs including a critical hit. Holy shit “Hawk”, calm down! Barriss turned in ready to unload some Concussion Missiles and left a Fang on one hull. Ndru came 4-forward and scrambled what would now be Toby’s fourth objective held. Anakin finished him off but the measly two point reward felt hollow at the end of the round…

Ongoing Score Counter: Losing, 9-7.
This is where I realised the game had reached a turning point and was about to snowball. The board was covered in red objective tokens and it was about to get out of hand fast. I powered on though refusing to give up regardless of how bleak it looked. “Hawk” moved to take the middle objective but I lost the objective in my bottom corner. Also, Ahsoka perished to a Gar Saxon powered Maul shot from her self inflicted C1-10P jam… Ouch. That gave Toby four kill points and four objective points while I only scored one.
Ongoing Score Counter: Losing, 17-8.
Okay, so let’s do a a win condition check.
- I cannot kill Maul before Toby wins on points.
- I could take a real good shot at the Fangs and if I kill both I’ll score 10 points. But that puts me on 18 and I can’t reach 20 before Toby does at the end of the round.
- If Barriss isn’t blocked by a Fang, I could possibly get one more objective before the end of the round but that still only puts me on 19 in the best case scenario.
‘The fight is done. We lost.’ I’m so excited for Kenobi. Roll on May! In any case, in a bid to score more points, and have some fun, I went in hard on the remaining Fang Fighters successfully killing one. Sadly, Barriss was blocked by the remaining Fang because of the ROAD result and therefore could not scramble an objective. Furthermore, I wasn’t able to destroy that Fang with my remaining shots. What did surprise me was an out of character move for Barriss who didn’t succumb to Mauls final shots of the game and survived! Hooray! Kind of…?

Result: Loss, 21-14.
Republic MVP: “Hawk” – Solid damage output while scrambling objectives and soaking lots of damage. .
Scum MVP: Maul – Threatening, looming power-piece that demands respect with three force, two agility and lots of health.
Okay, a lot to digest here but with a very simple message: Don’t sleep on these objectives. Scramble. Scramble! Scramble!! I would wager that this scenario has the biggest potential to snowball out of control the fastest and with some data from the course of the day I can probably prove it. But before I do, lets talk more about this round. For the third time today, a large ship was the thorn in my side and the MVP of game for the enemy. First it was Rey, then Kanan and now Maul… I’ve said it twice already but I’ll say it again: large ships not giving up half threshold as they perish is huge and I think that makes them a serious contender as some of the best ships in the game. Don’t get it twisted, I’m not saying you can just slap one of these on the board and do well with it. If you put it in a silly position and your opponent capitalises on it you will feel the sting. But if you know what you’re doing and you play cautiously I think you can really put the pressure on.
The next time I play this scenario I’m going to focus less on fighting in the middle and spend more time clocking over my points with the objectives. Make use of your ships to scramble the points you can without putting yourself in compromising positions. If you can’t, make sure you’re not letting the scales tip in the favour of your opponent. If you do, be prepared to do some heavy lifting to tip them back…
The Data
Okay, so I’m conscious this post has been a little long so I’ll start to wrap it up. I hope you’re still with me and if you are, you’re amazing.
Using the information on TTO we can determine what the average rounds were for each scenario over the course of the day. Before I do the maths I thought it would be interesting to make presumptions based on my experience and see if that leans true based on the data.

I predict that (with the exception of games that took way below the average or have mitigating circumstances) Scramble the Transmission will be the shortest game mode on average due to it’s snowball potential. Chance Encounter will be the second quickest scenario because of it’s familiarity with the player base and the increase in power of lists on the table. I’d then presume Salvage mission is third due to the aforementioned unreliability of critical hits to deny objective points. Lastly, Assault on the Satellite Array will be the longest scenario on average due to it’s accessible objective deniability and lack of half points thresholds which will increase the length of the games.
Average Rounds Per Scenario:
Assault on the Satellite Array – 6.4
Chance Encounter – 4.8
Salvage Mission – 5.8
Scramble the Transmission – 5.4
Not too bad and they’re all quite similar in length. But is this enough X-Wing for you? Personally, I didn’t feel like I played any less or any more X-Wing than normal.
Most of the data in TTO looks reasonable and there were only two cases of rounds being much shorter than the rest and both of those were in the Chance Encounter round. The outliers were a game that seemingly only lasted three rounds and my round with Tim Greenaway which was ended prematurely on turn four due to a concession. If we were to assume those two rounds lasted a little longer, say two/three each, the data looks more like this…
Average Rounds Per Scenario:
Assault on the Satellite Array – 6.4
Chance Encounter – 5.6
Salvage Mission – 5.8
Scramble the Transmission – 5.4
So what does this all mean? Apart from the fact I was right on the money with my predictions but you’ll have to take my word for it because there’s no way I can prove I guessed what I guessed before I did the maths.
Well, it means…

Conclusion
I really enjoyed flying the list I chose and it has some real strength. Throughout the day there were times when I felt like I didn’t have enough ships on the table and was fighting a losing battle but in hindsight that’s because I’d lost a ship early and was paying the cost. (Read: Barriss keeps dying and it’s because her massive balls are weighing her down).
Anakin and “Hawk” were my personal favourites throughout the day and it was glorious to see the damage they can do. If you are contemplating a Republic list I can’t recommended these two pilots enough. Moreover, when it comes specifically to the Laat, please don’t go down the route of Seventh Fleet Gunner. It’s a trap. The singular extra die on another friendly ship is not worth the trade off for the disarm token to re-arm it. I was consistently double-tapping with “Hawk” and found he rolled more dice and contributed more to my overall success than Barriss and Ahsoka combined. I can’t wait to put him back on the table.
I’m used to ships that go pop easily but my CLT Jedi flying is rusty and leaving a lot to be desired. If large ships do become more prevalent in the meta I think I may end up downgrading Anakin to Mace to fit in Luminara. Four CLT Jedi with “Hawk” as support could do some pretty gnarly things to a large ship base… But that’s a thought for another day.
Big thank you to everybody who attended. It was a fantastic day of X-Wing and I’m just grateful we all get to walk hand in hand into this new era of X-Wing together. Big thank you to Richard Greenaway and Excelsior! Bristol for hosting, it was very smooth and the prize support was fantastic as always.
I’m going to get some rest and keep practising for the Board in Brum event on Saturday 9th April. If you’re interested in this event and would like to attend you can find all of the information on the Facebook event page which is here. It would be great to see you there. Come and say hi!
Until next time…
Bye, Bongo. Bye, Spanners. Bye, Padre. Bye, Melly.
Smoke me a kipper, I’ll be back for breakfast.


